Mastering Single Paradiddles
In the Eight Essentials of an Artist Drummer, we discussed what it takes to become a truly outstanding drummer. This time, I'll show an exercise that can help you reach that goal. You'll learn how to master a basic drumming rudiment called the single paradiddle, and improve your coordination at the same time.
What's-A-Diddle?
Let's start by defining exactly what a paradiddle is, in case you're not familiar with the term. A paradiddle
is one of the 26 basic rudiments of drumming. (Actually there are more drum rudiments than the official 26,
but that's another article.) A drum rudiment is nothing more than a sticking pattern that has been given a
name. For example, if you played a right tap followed by a left tap and kept alternating that pattern, you'd
be playing a drum rudiment called the "single stroke roll." By playing two rights followed by two
lefts, you'd have a "double stroke roll." The sticking for the drum rudiment we will be working on
is RLRR LRLL. This is called the single paradiddle. There are also two variations to the single paradiddle
that we will be using: The first inversion is RRLR LLRL and the second is RLLR LRRL. I created the following
exercises using various combinations of all three of the previous single paradiddle stickings.
As you'll soon see, the exercises that follow start out at the beginner level but soon advance to stuff that would give pros a tough time. But if you want to be an artist drummer, you have to master your paradiddles. So let's get started.
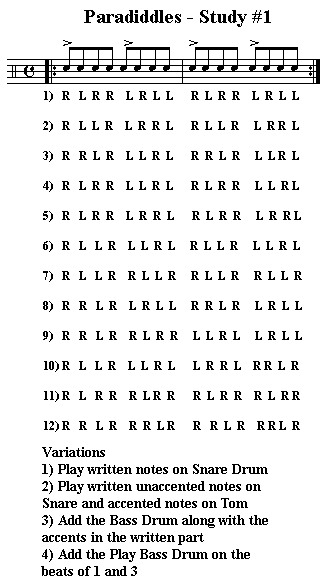
The First Study
Take a look at Study #1 below. You'll see that there are 12 different exercises. There are also some accents
(if you don't know what an accent is, check out Tiger Reading 101 in the sidebar). Here's the best way
to master these single paradiddle exercises:
- The first time you play these exercises, repeat each one until you become comfortable with the sticking pattern. Then move on to the next. For now, don't play the accents.
- Once you can easily play all 12 exercises, practice them all over again. This time, adding the bass drum part on beats 1 and 3. Play each of the 12 exercises separately, until you feel comfortable and can play each one with ease. Don't play the accents yet.
- Now go back to the first exercise and, this time, add the accents. If you have trouble playing the accents along with the sticking pattern and the bass drum (on beats 1 and 3), slow it down. Practice each exercise very slowly. Once you perfect an exercise, speed is easy to develop. The trouble with many (non-artist) drummers is that they never perfect anything at a slow tempo. They're in too much of a hurry to play fast, so they always play fast and sloppy.

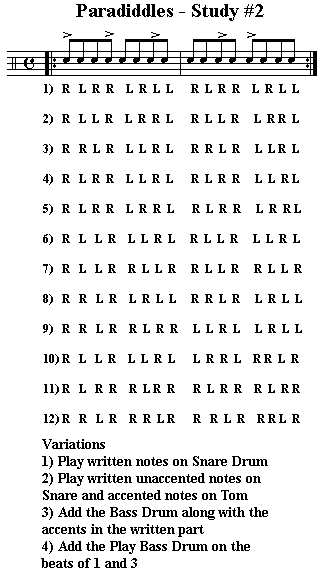
Study #2
Take a look at Study #2 below. You'll notice that the sticking patterns are the same as in Study #1, but the
accents are different. If you've already perfected Study #1, the sticking patterns here should give you no
trouble at all. It's the bass drum and accents that you'll have to watch out for. Again, take your time.
Approach these exercises methodically, as follows:
- Practice these adding the accents on the sticking patterns first, no bass drum yet. Practice slowly, until you can play them in your sleep.
- Go back to the first exercise in Study #2 and add the bass drum part, which you will play along with the accents on the snare drum. Practice all 12 exercises.
- Finally, go back to the first exercise in Study #2 and, this time, play the bass drum on beats 1 and 3 against the accented paradiddle patterns.

How are you doing so far? Want more? Sure you do. The more you practice, the easier it gets.
Read on.
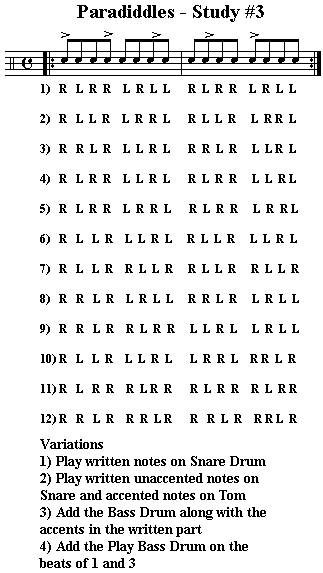
Study #3
Let's look at Study #3 below. By now, you should know the drill:
- Practice these 12 exercises adding the accents to the sticking patterns first. Practice them slowly, until you can play them in your sleep.
- Go back to the first exercise in Study #3 and add the bass drum part, which you will play along with the accents on the snare drum.
- Finally, go back to the first exercise in Study #3 again and, this time, play the bass drum on beats 1 and
3.

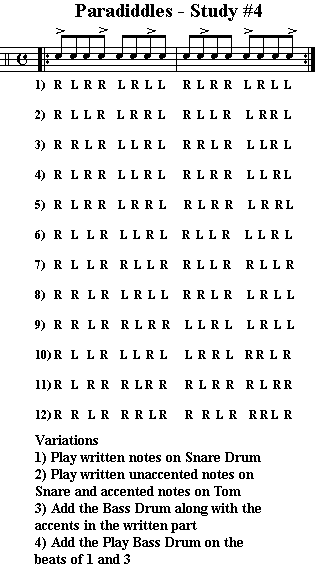
Study #4
Check out the fourth and final paradiddle study below. Here's how to practice it:
- Practice playing the accents on the sticking patterns first. Practice slowly, until they become second nature.
- Go back to the first exercise in Study #4 and add the bass drum part, which you will play along with the accents on the snare drum.
- Finally, go back to the first exercise again and, this time, play the bass drum on beats 1 and 3.

Endless Variations
That's it. You made it! You should be proud of yourself. You have now mastered all the single paradiddle
inversions, along with some difficult accents and bass drum coordination. Regardless of what musical style you
play, you'll find that there are many ways to apply paradiddles to the drum set. Here are just a few examples:
- Play these single paradiddle exercises with one hand on a ride cymbal and the other on the snare drum. This makes it sound like you're playing some really complicated polyrhythms, when all you're doing is playing paradiddle combinations on different drums and accessories.
- Play the paradiddle with each hand on a different drum. This gives you the same complicated polyrhythmic sound as the previous one.
- Break up the paradiddle patterns and play them around the drum set. For example, play all single strokes on the snare (RL) and all double strokes (RR LL) on a tom.
- If that's not enough for you, start the exercises all over again but this time add the hi-hat on beats 2 and 4 (operating it with your foot). That makes a great coordination study.
Many drummers think that rudiments (like the paradiddle) are outdated or useful only for marching band drummers, but nothing could be further from the truth. They are used by drummers of all musical styles.
Think about it for awhile and I'm sure you'll come up with your own ways of applying the paradiddle and other rudiments to the drum set. The whole idea is to be creative and have fun with it.
Until next time: Stay loose.
